Import user certificates
This page explains how you can import your user certificate in various places.
To be able to use your certificate for signing in Outlook or Adobe, you must first have requested it and imported it into the certificate store of your operating system.

Importing a certificate into the certificate store of an operating system
Once you have requested your certificate, you can import it. You should be able to find a "cert.p12" file in your download directory.
Double-click this to start the certificate import wizard.
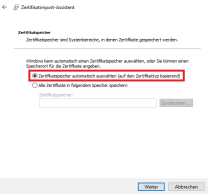
As soon as the wizard opens, set the storage location for your certificate to "Current user". Then confirm with "Next".

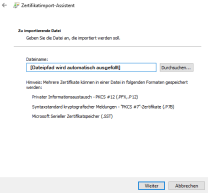
In the next window, you can select the file to be imported. The field for this should already be filled in automatically. Simply click on "Next".
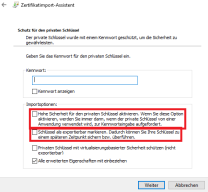
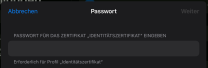
Before you enter your password in the next window, first define the import options. To do this, check the boxes for the first two options (see image below). Then enter the password that you specified when applying and confirm with "Next".
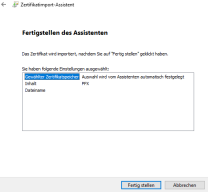
In the next step, you can specify the certificate storage location for your certificate. The wizard automatically determines the storage location based on the certificate type using the "Automatically select certificate storage" option.
Confirm the next window with "Finish" to close the wizard.
A new window opens informing you about the import process. Confirm this with "OK" to complete the process. Your certificate will be imported.
Once you have requested your certificate, you can import it. You should find a "cert.p12" file in your download directory.
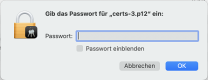
Double-click the file to import it. A window will open. Enter the password that you specified when applying and confirm with "OK"
You can find your imported certificate in your key ring under "Login" => "Certificates".
Once you have requested your certificate, you can import it. You should find a "cert.p12" file in your download directory.
You can also download the file to the device later. This can be done via Sciebo, for example. Alternatively, you can also send your certificate to yourself by e-mail.
If you receive a request to allow the profile download, click on "Allow".

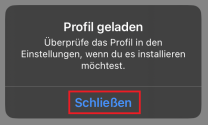
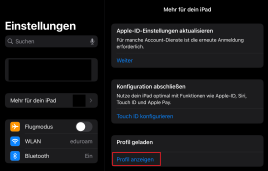
Once the certificate has been downloaded, it must first be imported. To do this, open your settings and then "General". There you will now find the item "Profile loaded", press "Show profile" to start the installation.
Press "Install" and then enter your device password(the password you use to unlock your device) if necessary.
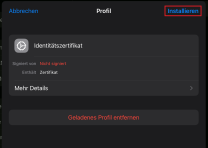
Now press "Install" (several times) until you are prompted to enter your password again.

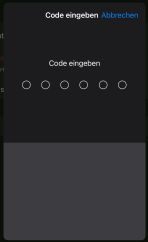
In the next step, you must now enter your certificate password. This is the password that you set when you applied for your certificate.
Finish the installation process with "Done".
You can now proceed to make the settings.
Signing
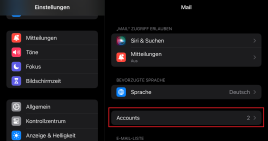
In order to be able to sign e-mails with your imported certificate, you must first make one more setting. To do this, open your settings and then the "Mail" menu item. Open the "Accounts" option there.
Now select "Exchange".
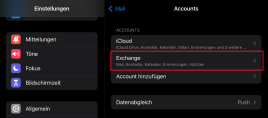
Now select your Exchange account and then open the advanced settings.


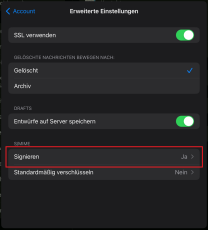
Select "Sign" and activate the signature by moving the lever.
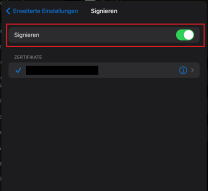
Go back to "Account" and confirm with "Done". Your emails are now signed with your user certificate.
Importing user certificates into Outlook or Thunderbird
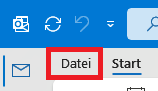
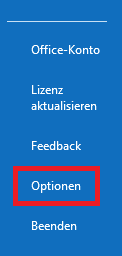
To use a user certificate to sign and encrypt emails in Outlok, you must first import it. To do this, first open Outlook and select the"File" tab.
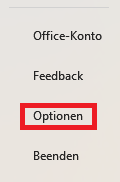
Now open"Options".
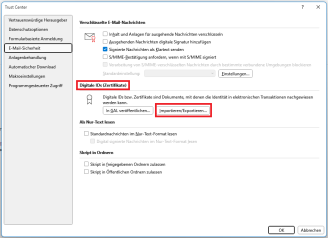
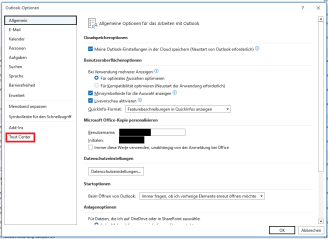
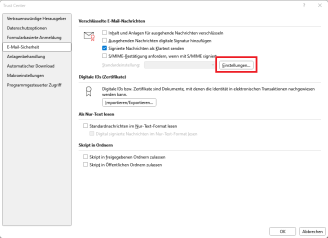
Under "Options", open the"Trust Center" and then"Trust Center settings...".
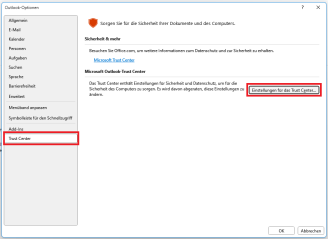
Select the "Email security" category here. There, under "Digital IDs (certificates)", click on "Import/Export...".
In the next window, click on "Browse" and select the certificate file. Confirm with "OK".
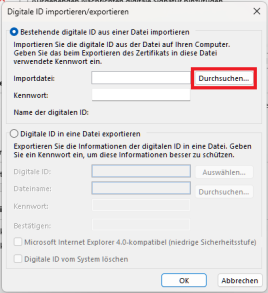
Then enter the password that you assigned when applying for the certificate and confirm with "OK".

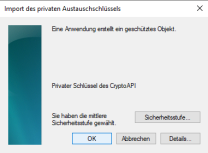
In the last step, confirm the "Import private exchange key" pop-up with "OK".
Note
To sign or encrypt your emails in Outlook with your user certificate, you must have imported the certificate beforehand. Only certificates that are also stored in the certificate store of the keychain management can be used for signing.
Signatures and encryption
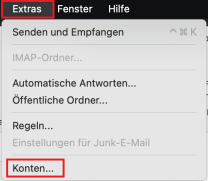
Once your certificate has been imported, you can now specify it for signing and encryption in the settings. To do this, open Outlook, select the "Tools" tab and then "Accounts...".
Select the account to which the certificate belongs and open the advanced settings by clicking on "Advanced...".
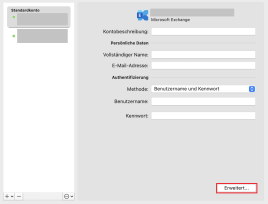
In the next window, select the "Security" tab and select your user certificate under "Certificate" (it usually has your full name). Check the box"Sign outgoing messages" and select the signature algorithm "SHA-256". Confirm with "OK" to complete the process.

Import
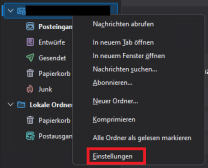
To be able to use your certificate to sign emails, you must first import it into Thunderbird.
To do this, select your email account by right-clicking in Thunderbird. Then open the settings via the drop-down menu:
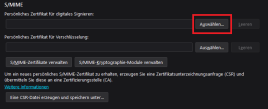
Under the menu item "End-to-end encryption" you will find the option "S/MIME".
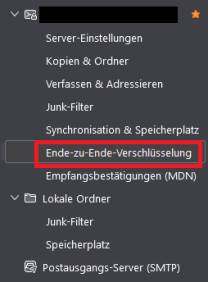
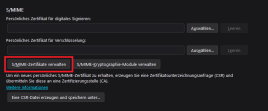
Select the item"Manage S/MIME certificates".
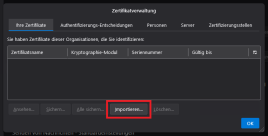
In the next window, click on"Import..." and then select your certificate file.
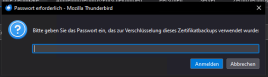
In the next step, you must enter the password that you selected when applying for your certificate. Confirm with"Log in".
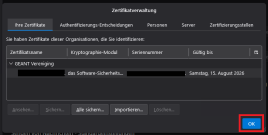
Your certificate has now been imported and can be set up. Select it from the list under "Your certificates" and confirm with"OK".
Digital signature and encryption
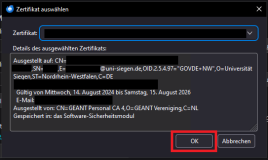
Back in the settings, select your certificate via"Select" under"Personal certificate for digital signing". Confirm with "OK".
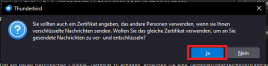
If you are then asked to also use your certificate for encrypting messages, confirm with"Yes".
Your certificate is now available for digital signing and encryption. However, before you can use it to sign emails, you must first change the settings.
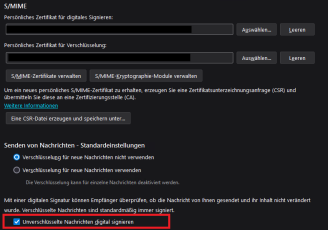
To do this, check the box next to"Digitally sign unencrypted messages" under"Send message defaults".
From now on, your certificate will be used for the digital signature of emails.
Importing user certificates from Adobe
With your user certificate, it is also possible to sign documents and forms in Adobe in addition to signing e-mails. To do this, however, you must first make a setting in Adobe Acrobat Reader. Simply follow the instructions below.
Open your Adobe Acrobat Reader.
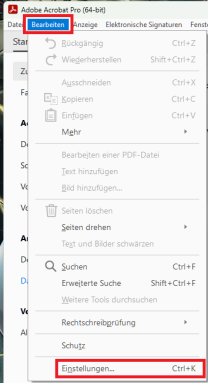
Open the"Edit" tab and select"Preferences" from the drop-down menu.
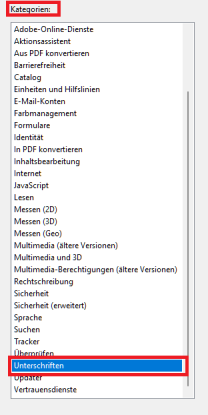
Then select the"Signatures" option in the categories on the left-hand side.
Under"Signatures", select"Verification" and click on"More...".

In the next window, under "Windows integration", check the "Verify signatures" and "Verify certified documents" options. Then confirm with "OK".
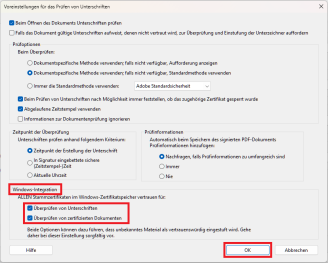
User certificates from the Windows certificate store should now be recognized.
To certify your document, open it and select "Certificates" from the tools. Then specify the place where the digital signature of your certificate should be displayed.
First you need to change the settings for trusted certificates. To do this, open the Acrobat settings.

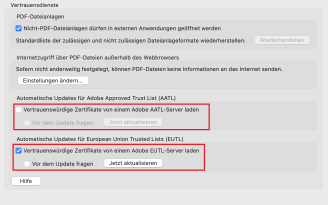
Open "Trust services" and check the boxes "Automatic updates for Adobe Approved Trust List (AATL)" and "Automatic updates for European Trusted Lists (EUTL)" under "Ask before updating", as shown in the image below. Then click on "Update now" for both items.

Now reset the settings you have just made. To do this, uncheck both boxes under "Automatic updates for Adobe Approved Trust List (AATL)". Under "Automatic updates for European Union Trust List (EUTL)", simply remove the checkmark next to "Ask before updating".
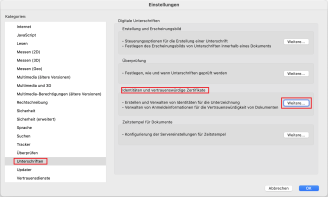
Then open"Signatures" and click on the "More..."button under "Identities and trusted certificates".
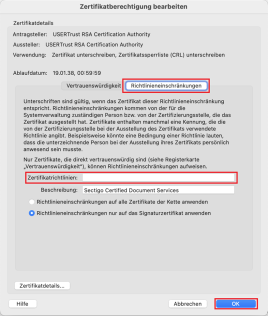
Find the "USERTrust RSA Certification Authority" certificate in the "Trusted certificates" list and click on the Edit button (pencil icon).
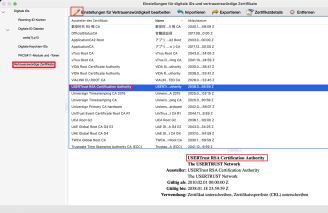
Open the policy restrictions here and remove all entries under the "Certificate policies" item. Confirm with "OK".
You can now start setting up your certificate as a signature.
Set up signature
To be able to use your certificate as a digital signature, open the settings in Acrobat.
Then open "Signatures" and"More..." under "Identities and trusted certificates".
In the next window, you can find your certificate under "Digital IDs". Click on the edit button (pencil symbol).
Set your certificate as a digital signature here by ticking the boxes under "Use for signing", "Use for certifying" and "Use for encrypting".
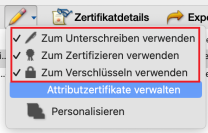
If you cannot find your certificate under "Digital IDs", it is possible that you have not yet imported it. Import your certificate to be able to carry out this step.
Your certificate can now be used for digital signing with Adobe.
Troubleshooting
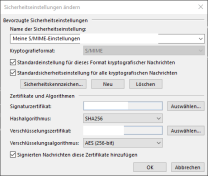
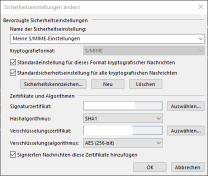
Due to new security measures, the hash algorithm SHA1 is no longer recognized as secure for signatures. This can lead to problems with some e-mail clients, which consider S/Mime signatures with SHA1 to be invalid as a result of this change. To avoid this problem, the hash algorithm in your e-mail client must be changed. There are two ways to do this in Outlook:
Import re-file
To change the hash algorithm, you can execute the reg file, which you can find in this document.
Download the file here
and execute it by double-clicking.
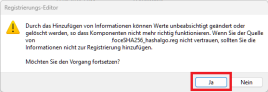
Confirm the user account control with "Yes".
Then confirm the pop-up of the registration editor with "Yes".
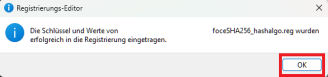
Then restart Outlook once to apply the settings.
Outlook Trust Center
Alternatively, you can also change the setting manually. To do this, proceed as follows:
First open Outlook and select the "File" tab. Then open "Options".
Here, open the Trust Center and then the "Trust Center settings...".

In the Trust Center settings, open the "Email security" menu item.
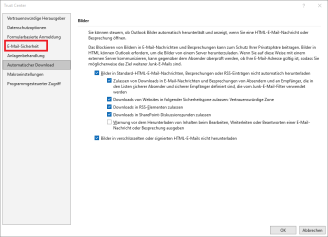
Now open the "Settings" under "Encrypted e-mail messages".
SHA1 is now displayed as the hash algorithm under Certificates and algorithms. Change this to SHA265 and confirm with "OK".