Exchange accounts (Outlook) (MacOS)
On this page you will learn how to add Exchange accounts to Outlook on MacOS devices.

Instructions
Hint
A new mail client called "Outlook (new)" is available for Windows and macOS. There are some significant differences to Outlook from the Office package. The following Microsoft article shows the differences in appearance.
One of the main differences is the lack of the important Exchange connection - see FAQ article: The new Outlook
The use of "Outlook (new)" is therefore not recommended. Instead, employees and students of the University of Siegen can book the Office package free of charge. The Outlook included in this package is fully usable and is also supported by ZIMT.
Setting up an account
The setup procedure is described for Microsoft Outlook (as part of the Office package or as a standalone version) in "Legacy Mode". There may be deviations from the "Modern Skin".
If you have not yet set up an Outlook account, the client will prompt you to do so the first time you use it.
Otherwise, you can set up a new account in Microsoft Outlook as described here. To do this, first open the Outlook client. You can now add a new account via the "Tools" tab under "Accounts".
Alternatively, you can call up "Accounts" via the "Tools" drop-down menu.
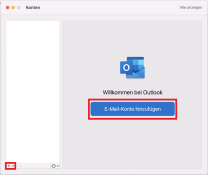
In the new window, click on "Add e-mail account" or on the "+" symbol in the bottom right-hand corner of the window.
You can now enter your e-mail address in the next window and confirm with "Next".
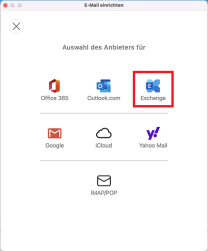
An attempt is made to automatically find the corresponding mailbox and the appropriate transfer protocol using the e-mail address entered. After a few seconds, the configuration found will appear - in this case "Exchange". If this is not your desired connection, you can display a selection via "Not Exchange?".
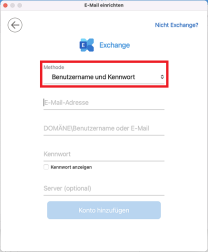
Then enter your user name +@uni-siegen.dein addition to the e-mail address already entered
(e.g. g123456@uni-siegen. de) and your password. Optionally, you can also enter the server mail.uni-siegen.de
server. Then confirm with "Add account".
If a server query is displayed (see image below), check the box next to"Always save my answer for this server" and confirm with"Allow".

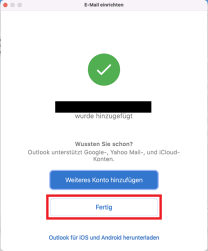
If the account has been set up successfully, the following window will appear. Confirm here with "Done".
This completes the account setup. You may need to restart Outlook to apply the changes.
