Shared mailboxes
On this page you will learn how to add shared mailboxes to Outlook for Mac, Apple Mail, gMail and Thunderbird.

Instructions
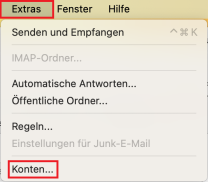
To add a shared mailbox in Outlook, open your Outlook client and then the "Tools" menu item in the top menu bar. Select the "Accounts..." option here.
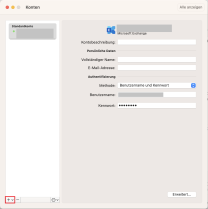
In the next step, click on the "+" symbol to add a new account.
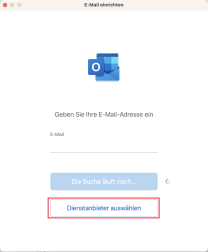
Now enter the e-mail address of the shared mailbox during setup. Confirm with "Next" to select the provider.

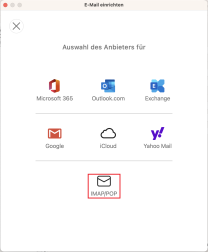
After you have confirmed with "Next", click on "Select service provider". For shared mailboxes, "IMAP/POP" must be selected.
You can then configure the shared mailbox. To do this, enter the user name according to the following scheme: [your ZIMT user ID]@uni-siegen.de\[user ID shared mailbox] (e.g. g123456@uni-siegen.de\shared-example)
Enter the ZIMT password for your primary account.
For the incoming and outgoing mail server, enter "mail.uni-siegen.de".
Finally, confirm with "Add account".
After successful configuration, you will be shown the confirmation screen. Finally, confirm with "Done".
To be able to send e-mails from a shared mailbox, you need to make one more setting. To do this, open the advanced settings for the account you have just added by selecting it in the account overview and opening "More options".

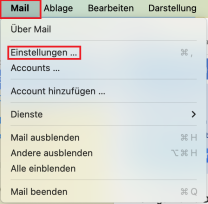
To set up a shared mailbox with Apple Mail, open the Apple Mail settings by clicking on "Mail" in the menu bar and then selecting "Settings".
Then click on the "+" symbol in the next window to add an account.

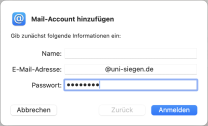
In the next window, enter the e-mail address of the shared mailbox. Enter your ZIMT password as the password. Then confirm with "Log in".
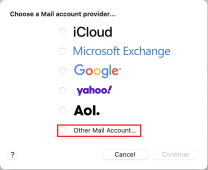
Now select the service provider. IMAP/POP must be selected here for shared mailboxes. Do this by selecting "Other provider".
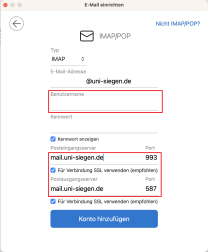
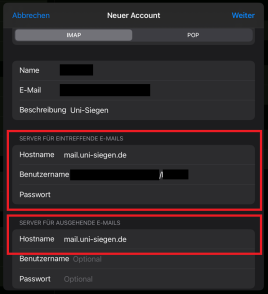
In the next step, you must configure the mailbox. To do this, enter the user name according to the following scheme: [username own account]@uni-siegen.de\[username shared mailbox] (e.g. g123456@uni-siegen.de\shared-test).
Also enter the servers for incoming and outgoing emails. For both this is mail.uni-siegen.de. Confirm again with "Login".

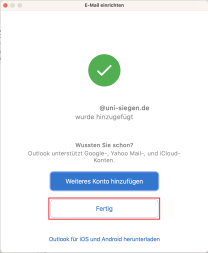
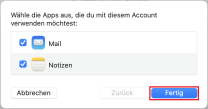
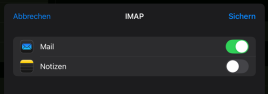
It will now take a moment for the mailbox to be added. In the last step, specify which elements are to be synchronized. Now end the process with "Done".
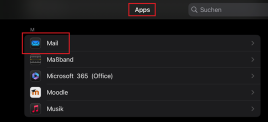
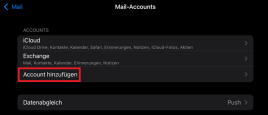
To set up a shared mailbox in Apple Mail for iOS, first open your settings and then "Apps". Select the "Mail" option here.
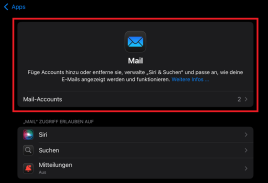
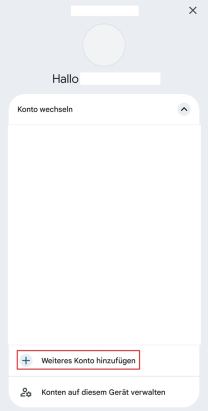
Under Mail, select the option "Mail Accounts" and then "Add account".
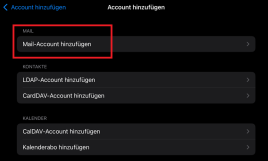
Then select "Add mail account" again under "Mail".
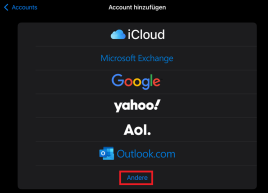
Shared mailboxes must be set up using the IMAP/POP protocol. Therefore, select "Other" under the provider list.
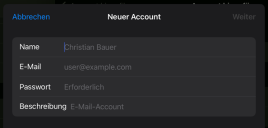
Now enter the e-mail address of the shared mailbox but the password for your own ZIMT account. Name and description are optional.
In the next step, you must configure the mailbox. To do this, enter the user name according to the following scheme: [username own account]@uni-siegen.de/[username shared mailbox] (e.g. g123456@uni-siegen. de/shared-test).
Also enter the servers for incoming and outgoing emails. For both, this is mail.uni-siegen.de. Confirm again with "Login".
The process may now take a moment. You will then be asked which functions should be synchronized. Select "Mail" and confirm with "Save" to add the account.
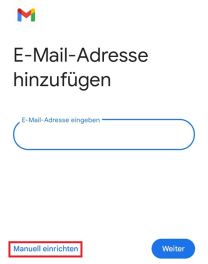
To add a shared mailbox to GMail, open the app and then the overview of your accounts. Select the "Add another account" option here.
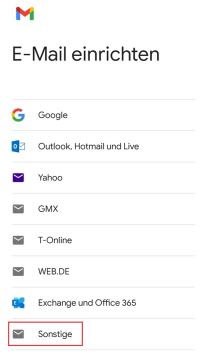
Then select "Other" under Provider.
Now enter the email address of the shared mailbox and click on "Set up manually".
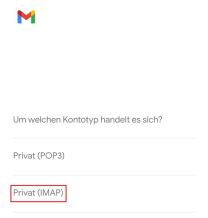
The next step is to select the account type. For shared mailboxes, this is "IMAP".
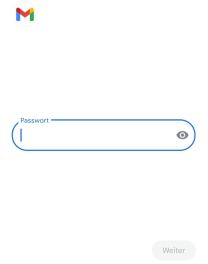
Now enter the password.
Important: The ZIMT password for your primary account must be entered here. Confirm with "Next" to configure the account.
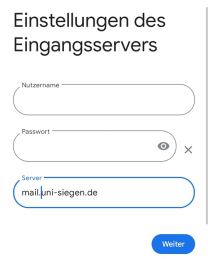
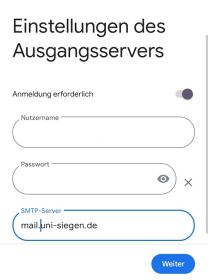
Now enter the server "mail.uni-siegen.de" under the incoming server settings. Enter the user name according to the following scheme: [user name of your primary account]@uni-siegen.de\[user name shares mailbox] (e.g. g123456@uni-siegen.de\shared example)
In the outgoing server settings, also enter "mail.uni-siegen.de" under "Server". Then remove the user ID of the shared mailbox after your user ID. Confirm with "Next" and enter "mail.uni-siegen.de" under "Server" in the outgoing server settings. Then remove the user ID of the shared mailbox behind your user ID. Confirm with "Next".
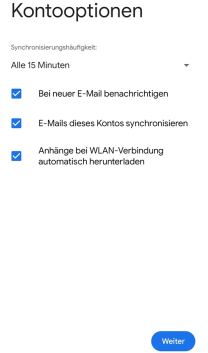
Once the account has been successfully configured, you can define the account options. Confirm with "Next" to add the account.
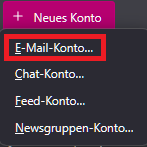
To set up a shared mailbox in Thunderbird, open your Thunderbird client and then the settings.
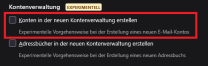
Before you can configure and add the mailbox, you must uncheck "Create accounts in the new account management" in the settings under "Account management".
Now open the account settings. Click on "New account" and select "Email account" to add a new account.
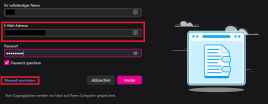
Now enter the e-mail address of the shared mailbox. Enter the ZIMT password of your primary account as the password. Then select "Set up manually".
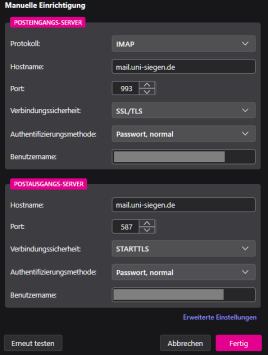
Enter the following data in the manual setup:
Incoming mail server
- Protocol: IMAP
- Hostname: mail.uni-siegen.de
- Port: 993
- Connection security: SSL/TLS
- Authentication method: Password, normal
- User name: [user ID of the primary account]@uni-siegen.de\[user ID shared mailbox](e.g. g123456@uni-siegen.de\sharedexample)
Outgoing mail server
- Hostname: mail.uni-siegen.de
- Port: 587
- Connection security: STARTTLS
- Authentication method: Password, normal
- User name: [user ID of the primary account]@uni-siegen.de\[user ID shared mailbox](e.g. g123456@uni-siegen.de\sharedexample)
Confirm with "Done". In the last window, end the process with "Exit". The mailbox will then be displayed in your account overview.
