
Setting Up eduMFA (All Token Types)
After a token is generated, you will be required to enter this second factor the next time you log in on the ZIMT login page—for example, when accessing the service via eduVPN. Without this second factor, you will no longer be able to log in to the service.
It is therefore strongly recommended that you generate at least two keys so that you can access your account in case of an emergency.
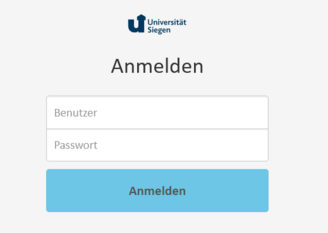
To roll out one—or ideally several—tokens, first log in to the eduMFA portal.
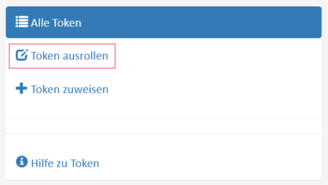
Then select the“Deploy Tokens” menu item.
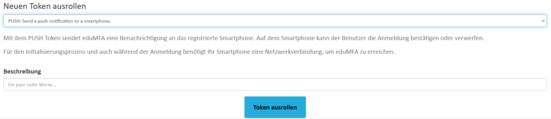
To roll out a PUSH token, select the“PUSH” option under “Roll Out New Token.” For better organization in the portal, also enter a short description for your new token. Now confirm by clicking“Roll Out Token.” Also, download the“eduMFA Authenticator” app from your device’s app store.
A QR code will then be displayed. You must scan this code with the eduMFA Authenticator app to generate a token.
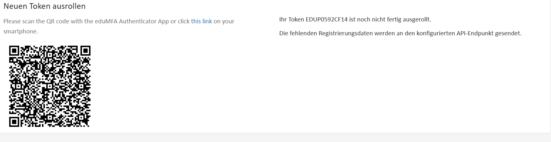
To do this, open your app and tap the “+” icon. The camera will open, allowing you to scan the QR code directly within the app. Alternatively, you can open the link above the QR code.
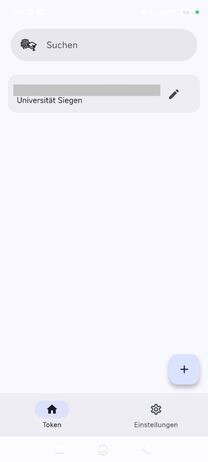
Once the token has been successfully set up, you can enter your password as usual when logging in. You will then receive a push notification via the Authenticator app on your smartphone, which you can confirm to complete the login process.
After a token is generated, you will be required to enter this second factor the next time you log in on the ZIMT login page—for example, when accessing the service via eduVPN. Without this second factor, you will no longer be able to log in to the service. It is therefore strongly recommended that you generate at least two keys so that you can access your account in case of an emergency.
Warning: If you cancel the setup of the TOTP token before verification is complete, you will not be able to display the QR code again, rendering the token unusable. You will then only be able to deactivate it via the dashboard.
To roll out one—or ideally several—tokens, first log in to the eduMFA portal.
Then select the“Deploy Tokens” menu item.
To roll out a TOTP token, click “Roll Out New Token” in the portal’s left-hand menu bar and select“TOTP.”
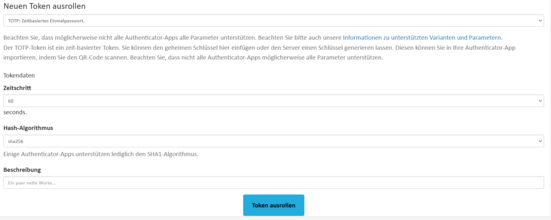
Next, define the desired token settings. By default, the time interval is set to 60 seconds and the sha256 hash algorithm is selected. Most authenticator apps support these settings.
If you are using an authenticator that only supports SHA-1 (e.g., Microsoft Authenticator) and/or only 30-second time intervals, please select the appropriate options before rolling out the token. For better clarity in the portal, also enter a short description for your new token. After you have defined the token data, confirm by clicking“Roll out token.”
After scanning the QR code, the authenticator app generates a new 6-digit PIN—known as the OTP value—every 30 or 60 seconds.
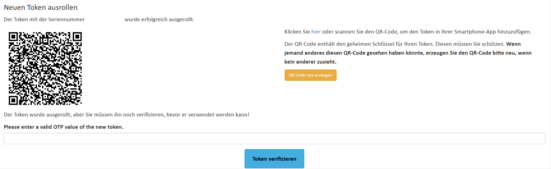
A QR code will now be displayed, which you can scan in your Authenticator app to add the token there. In the bar below the code, you can now enter the 6-digit OTP value and verify it by clicking“Verify Token.”
After a token is generated, you will be required to enter this second factor the next time you log in on the ZIMT login page—for example, when accessing the service via eduVPN. Without this second factor, you will no longer be able to log in to the service. It is therefore strongly recommended that you generate at least two keys so that you can access your account in case of an emergency.
To roll out one—or ideally several—tokens, first log in to the eduMFA portal.
Then select the“Deploy Tokens” menu item.
To roll out a TAN list, click the “Roll Out Token” entry in the portal’s left-hand menu bar and select“TAN.” For better organization within the portal, also enter a short description for your new token. Then click“Roll Out Token” to complete the setup process.

Finally, click“Print OTP List” to print the TAN list and then store it in a secure location (e.g., a lockable cabinet or rolling file cabinet). Please do not save the TAN list on your device.
Warning: Once you leave the page, you will no longer be able to print the TAN list. Therefore, do not close the page until you have printed the list.

After a token is generated, you will be required to enter this second factor the next time you log in on the ZIMT login page—for example, when accessing the service via eduVPN. Without this second factor, you will no longer be able to log in to the service. It is therefore strongly recommended that you generate at least two keys so that you can access your account in case of an emergency.
Note: The process for obtaining a YubiKey differs for Central Administration (ZV) employees compared to all other employees. If you have been issued a ZV YubiKey, please follow the instructions for ZV employees.
The YubiKey is a way to use a one-time password generated via a hardware token. To deploy a YubiKey as a second factor, you first need the physical key and the YubiKey Authenticator Client.
You can configure two memory slots in the Yubico Authenticator: Slot 1 – Short Touch or Slot 2 – Long Touch. Depending on which slot you choose, you’ll need to either briefly touch (1–2.5 seconds) or hold down (3–5 seconds) the gold area in the center of the YubiKey to generate the one-time password.
Configuring the YubiKey
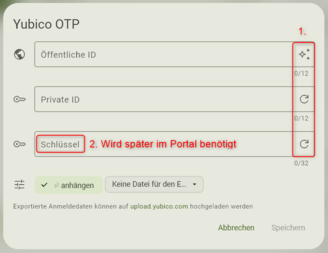
To use a YubiKey as a second factor, you must first configure it. To do this, open the YubiKey Authenticator and select the “Slots” category from the left-hand sidebar. Now select the desired slot. Then select“Yubico OTP.”
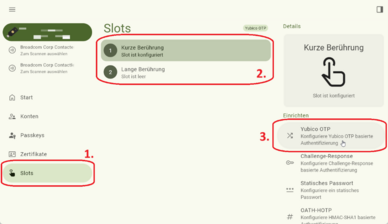
Next, you must fill in the following three fields:
• Public ID: 12-character (6-byte) Modhex value (letters only).
• Private ID: 12 characters (6 bytes) Hex value.
• (Secret) Key: 32 characters (16 bytes) hex value.
In the "Public ID" field, click the icon on the right (tooltip: Useserial number ) to use your YubiKey's serial number. Alternatively, you can enter your own hex and decimal values using Yubico’s Modhex Converter3 and then copy the Modhex value. The values for the“Private ID” and“Key” fields can be easily generated using the “Generate Random” buttons. You can use these as often as you like.
Please record your values in a format of your choice (e.g., as a screenshot or in a password manager) and store them in a secure location. Once setup is complete, you will no longer be able to view your values.
This completes the setup of the one-time password process on the YubiKey. The next step is to add the YubiKey to the MFA portal so that it can be used for the University of Siegen’s services.
Rolling Out the YubiKey as a Second Factor
To roll out one—or ideally several—tokens, first log in to the eduMFA portal.
Then select the“Deploy Tokens” menu item.
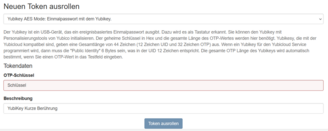
To assign your YubiKey as a second factor, log in to the MFA portal and select the “Deploy New Token” option. Then select the YubiKey from the list of available tokens.

Now enter the key you generated earlier inthe “OTP Key” field. Confirm by clicking“Deploy Token.” For better organization in the portal, also enter a short description for your new token. Your YubiKey can now be used for MFA authentication.
After a token is generated, you will be required to enter this second factor the next time you log in on the ZIMT login page—for example, when accessing the service via eduVPN. Without this second factor, you will no longer be able to log in to the service. It is therefore strongly recommended that you generate at least two keys so that you can access your account in case of an emergency.
HOTP tokens are typically hardware tokens, such as an alternative to the YubiKey.
To deploy one—or ideally several—tokens, first log in to the eduMFA portal.
Then select the“Deploy Tokens” menu item.
To assign a HOTP token, select the “HOTP” option under “Deploy New Token.”

Next, define the desired token settings. These include the OTP length (6 or 8 characters) and the hash algorithm (sha1, sha256, or sha512). Please check in advance which parameters your token supports, as it will only work with the correct values. Then, if it is checked, uncheck the box next to“Generate OTP key on the server.” The input field for the OTP key will then appear. Enter the token’s seed here, which you should have received from the manufacturer or retailer.
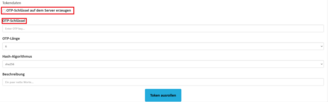
To complete the token creation, you must also provide a description. Enter a name here that you can easily recognize.
For example: HOTP Feitian C200
Now click the “Roll Out Token” button. An optional QR code will be displayed on the next page. If you’re using a token that requires a QR code, you can scan it here. In all other cases, you can ignore the QR code.
There may be various reasons why it is necessary to delete or deactivate individual tokens. Examples include:
• You have lost your YubiKey.
• You need a new TAN list.
To do this, log in to the eduMFA portal or, if you’re already logged in, click“All Tokens” in the left-hand sidebar.
Now select the token you want to delete or deactivate from the list by clicking on its serial number. This will open a detailed overview of the corresponding token. Here, you can either delete or deactivate the token. Clicking the “Deactivate” button allows you to reactivate the token at a later time, while the “Delete” button permanently deletes the token.

If you want to reactivate the token later, you can click the “Activate” button here to reactivate it (e.g., if you’ve found your YubiKey again).

Setup of eduMFA for Central Administration
Once you have set up a second factor, you will be prompted to use it the next time you log in on the ZIMT login page. Without this second factor, you will no longer be able to log in to the service. For this reason, we strongly recommend that you generate an additional second key—for example, in the form of a TAN list—which you can use to access your account in an emergency. Be sure to print out the TAN list afterward and keep it in a safe place.
Warning: Treat your YubiKey like a physical key. Always carry it with you—even when you’re away or on vacation—and never leave it unattended or permanently plugged into your device.
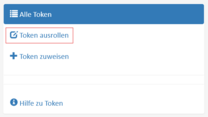
To assign your YubiKey as a second factor, first log in to the eduMFA portal. Then click“Assign Token” in the left-hand sidebar.
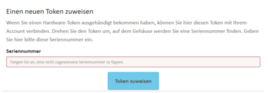
Now, under“Serial Number,” enter the serial number of your YubiKey. You’ll find this on the back of your YubiKey.
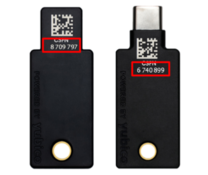
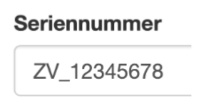
Note: If you are logged in with your ZIMT account, you must prefix the serial number with“ZIMT_”. If you are logged in with your ZV account, you must prefix the serial number with“ZV_”.
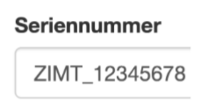
Now confirm the process by clicking “Assign Token.”
Once you have set up a second factor, you will be prompted to use it the next time you log in on the ZIMT login page. Without this second factor, you will no longer be able to log in to the service. For this reason, we strongly recommend that you generate an additional second key—for example, in the form of a TAN list—which you can use to access your account in an emergency. Be sure to print out the TAN list afterward and keep it in a safe place.
Warning: Treat your YubiKey like a physical key. Always carry it with you—even when you’re away or on vacation—and never leave it unattended or permanently plugged into your device.
To generate a TAN list, first log in to the eduMFA portal. Then click“Assign Token” in the left-hand sidebar.
Now, in the list under “Deploy Token,” select the“TAN” option and enter a short description. Confirm the process by clicking“Deploy Token.”
Finally, click the“Print OTP List” button to print the TAN list and then store it in a secure location (e.g., a lockable cabinet or rolling file cabinet). Please DO NOT save the file to your device.
Warning: Once you leave the page, you will no longer be able to print the TAN list. Therefore, do not close the page until you have printed the list.
There may be various reasons why it is necessary to delete or deactivate individual tokens. Examples include:
• You have lost your YubiKey.
• You need a new TAN list.
To do this, log in to the eduMFA portal or, if you’re already logged in, click“All Tokens” in the left-hand sidebar.
Now select the token you want to delete or deactivate from the list by clicking on its serial number. This will open a detailed overview of the corresponding token. Here, you can either delete or deactivate the token. Clicking the “Deactivate” button allows you to reactivate the token at a later time, while the “Delete” button permanently deletes the token.
If you want to reactivate the token later, you can click the “Activate” button here to reactivate it (e.g., if you’ve found your YubiKey again).
